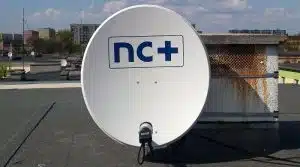
In order to properly install and align a satellite dish, it is important to choose an appropriate place for installing the dish – it should provide a view of the sky in the southern direction.
Installing a satellite dish will be easier if:
– The place of mounting of the antenna is easily accessible and does not require working at heights (garden, terrace).
– The building is your property and is not subject to conservation or council protection
– The distance from the antenna to the set top box of NC+ or Cyfrowy Polsat is not long and there are not many obstacles on the way.
– Mounting the antenna does not require drilling through ceilings and thick walls.
– You have another person to help you.
We will need materials and tools before we can begin installation:
– antenna set, i.e. antenna with converter (for NC+ decoder with HDD we recommend double “Twin” converter and for Evobox Cyfrowy Polsat – dedicated Inverto converter).
– antenna mast or bracket mounted to the wall, balustrade or balcony
– 75 ohm antenna cable suitable for satellite installations, suitable for outdoor use,
– plugs preferably screwed on the cable of “F” type, matched to the diameter of the coaxial cable,
– wrenches and tools needed to fix the mast, a drill with a hammer and drill bits for walls,
– compass, protractor, ruler,
– other materials – cable ties or glue, insulating tape, plugs, etc. and, if it is not possible to make a hole for the cable, a window adapter
Mounting a mast or antenna bracket.
The mast should be a steel pipe with the external diameter recommended in the antenna installation manual (approximately 35 – 45 mm). In shops with satellite dishes you can buy various types of antenna brackets mounted to walls, horizontal railings, or poles. Choose a bracket that suits the installation location. The bracket should be mounted to a rigid substrate and very solidly, because of the possible consequences of dropping the antenna e.g. during strong winds.
Wire routing.
The cable connecting the antenna set with the decoder up to 30 meters long (more when using amplifiers) does not affect the reception quality. We do not recommend connecting the cable in sections, unless the use of a special connector placed in the window in the form of a section of flat cable is the only way of getting the signal from the antenna to the interior of the building.
The cable should be fixed and routed where there is no risk of tripping or damaging it. Avoid bending the cable sharply. If the converter is equipped with a special seal preventing water from penetrating (it resembles a teat), it should be put on the cable preferably before inserting the plugs (converters with sliding casing do not need a seal).
Aiming and adjusting the antenna.
Observe the signal strength and quality readings on the decoder (another person should help you here) and make very small movements with the antenna so that the converter moves less than half a centimeter at a time, and wait a moment after each movement for the readings to stabilize the signal. Look for the position where the indications are highest.
Attention! The decisive factor is the indication of signal quality. The maximum value of this parameter should be chosen, even at the expense of reducing signal strength. If you find the position of the antenna with maximum signal strength and the quality is zero, it means that the antenna is directed to another satellite and you should continue searching, changing mainly the direction of the antenna.
After searching for a satellite you should adjust the LNB’s settings aiming at maximum quality. By moving the converter in the antenna holder closer and further from the dish and rotating the converter right/left you have to find the best position. Then tighten the screws securing the converter and the screws securing the antenna to the mast. The latter should be screwed on alternately, at the same time controlling signal parameters, so that the resulting deformation of the antenna mounting elements does not change its alignment.
Antennas mounted to masts with two screws may require additional correction of the elevation angle after they have been tightened. Remember to tighten the antenna elevation fixing screws firmly (you will need two wrenches). When the antenna is properly positioned, information on the possibility and method of service activation will be displayed on the ACTIVATION SCREEN.
However, if you would not be able to accurately adjust the signal of a satellite dish, or you simply do not have the tools or willingness for such a challenge, we will send a fitter to you, who will carry out a professional installation of Polsat or NC+ satellite dish
The shortest wait time for our service possible in the area:
Brentford, Chiswick, TWICKENHAM, Hounslow, Hammersmith, London, Chessington, Kingston upon Thames, Kingston, New Malden, Norbiton, Old Malden, Surbiton, Tolworth, SLOUGH, READING, UXBRIDGE, STAINES, CHERTSEY, HAYES, SOUTHALL, RUISLIP, HENDON, KEW, BRACKNELL, WATFORD, WILLESDEN. NEASDEN, CRANFORD, Colnbrook, SUNBURY, FELTHAM, Heathrow, WINDSOR, MAIDENHEAD, HIGH WYCOMBE, PUTNEY, SHEEN, GUILDFORD, WOKING, ESHER, HATFIELD, ST. ALBANS, FAMBOROUGH, ALDERSHOT, NEWBURY, BASINGSTOKE, Langley, WOKINGHAM, UK.
Call 07988424050, 02085773782 to book a professional or simply write and we will contact you to arrange a convenient appointment.
Come on!


